Setup with iso image
Hardware Requirements
- Raspberry 3b or better
- 32 GB microSD Card
- MicroSD Card reader
-
Power supply
We would recommend using an official power supply for Raspberry Pi, but if you are on a budget you could also try to use a charger for a mobile phone.
-
Microphone
In our setup we use the ReSpeaker 4-Mic Array for Raspberry Pi but most USB-microphones should work as well.
-
Speakers
We used different kinds of analog speakers.
Download image
You can download a complete image for our voice assistant here.
We used the Win32DiskImager to write it to an empty SD-Card.
Write the image on a SD-Card
To write an image to your SD-Card you can use one of the following Programs:
- Raspberry Pi Imager (Win, Ubuntu, Mac)
- Belenaetcher (Win, Ubuntu, Mac)
- Rufus (Windows only, can write bigger images on smaller SD-cards)
Expanding the file system in the command line
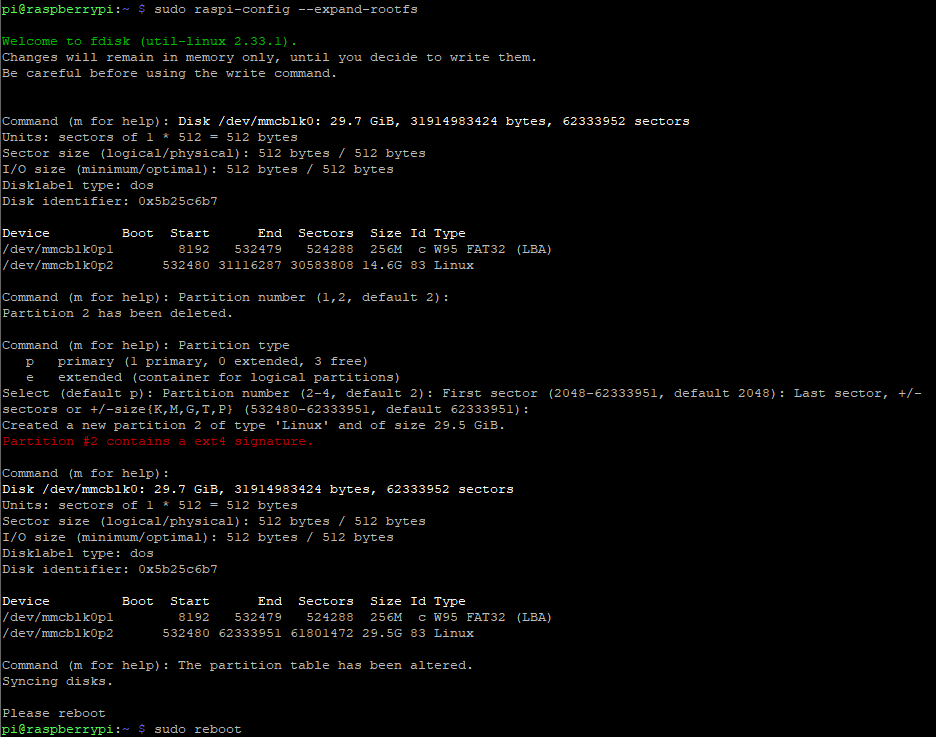
If you used a bigger SD-card bigger than your image you should expand the file system to use all available space on the SD-card. In the following screenshots we wrote a 16 GB image on a 32 GB SD-Card.
With the command df -h you can list the filesystem (fs).
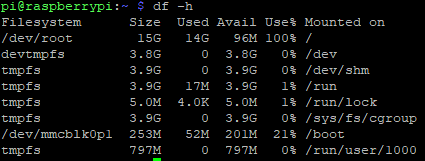
In the first row you can see that the /dev/root folder only takes up 15 GB of space. sudo raspi-config --expand-rootfs
expands the filesystem.
Using df -h again…
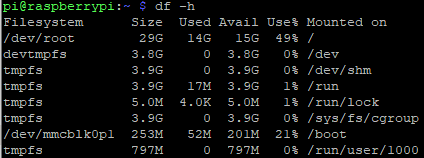
you can check that /dev/root uses almost all the 32 GB of the SD-Card.
Setup fresh
Download raspberry image and install on SD card
You will probably need a 32 GB SD card if you want to train your own wake word model in precise. We recommend downloading and installing the full version with Graphical User Interface. Using the light version leeds to many compatibility issues. You might need to install a lot of software, which is already included in the full version. https://www.raspberrypi.org/downloads/
Enable SSH and Wi-Fi
After installing the image on your SD card, you can enable SSH by creating a file with the name SSH and no file extension.
You can make your pi connect to Wi-Fi automatically by creating a file named wpa_supplicant.conf in the boot directory.
It has to have the following content:
country=DE                              # You can change your countrycode here.
ctrl_interface=DIR=/var/run/wpa_supplicant GROUP=netdev
update_config=1
network={
    ssid="intia"                        # Enter your wifi network name here.
    psk="Bunteslicht10"                 # Enter your wifi password here.
    key_mgmt=WPA-PSK                    # It is recommended to use "" around your values to prevent erors with spaces.
}
Connect to your Raspberry
After inserting the SD card and booting the Pi you can ssh after a little while. You will need your Pi’s IP-Address to connect with via a SSH tool like Putty. You can find it in your router’s web-interface.
Default user is pi and the password is raspberry.
First we want to run these commands and reboot:
sudo apt update
sudo apt full-upgrade
sudo reboot
Install Pip and Git if you have used the light version
After rebooting you can install pip and git:
sudo apt install python3-pip
sudo apt install git
Install Respeaker Microphone Array
To install the Microphone array you can follow the guide on seeedstudio.com Installing the LED drivers is optional.
git clone https://github.com/respeaker/seeed-voicecard.git
cd seeed-voicecard
sudo ./install.sh --compat-kernel
reboot
This can take more than 10 minutes.
sudo nano /etc/asound.conf
Comment out all of the “pcm.!default” and below ad :
pcm.!default {
type pulse
# If defaults.namehint.showall is set to off in alsa.conf, then this is
# necessary to make this pcm show up in the list returned by
# snd_device_name_hint or aplay -L
hint.description "Default Audio Device"
}
ctl.!default {
type pulse
}
Now change the audio output and activate the SPI.
sudo raspi-config
# Select 7 Advanced Options
# Select A4 Audio
# Select 1 Force 3.5mm ('headphone') jack
# Select 5 Interfacing Options
# Select P4 SPI
# <Yes>
# Select Finish
Install Mosquitto and Node-Red
sudo apt-get install mosquitto mosquitto-clients -y
sudo apt install build-essential git  # This fixed a Problem running the script in the next line.
bash <(curl -sL https://raw.githubusercontent.com/node-red/linux-installers/master/deb/update-nodejs-andnodered)
sudo systemctl enable nodered.service # This starts Node-Red when the pi is booting.
You can enter Node-Red under http://<hostname>:1880.
What’s next?
If you used our image to install Heimdall, you may want to take a look at our user-section.
But if you are installing Hemdall from scratch, you should check our documentation of Rhasspy.
After you fully installed and set up Heimdall, you should read our features-pages starting with the light-control.